
 The Ambilight TV range from Philips offers LED lighting around the sides of the TV, creating the fantasy that the picture displayed on the screen somehow carries on outside the edges of the display. However, what about if someone wants LED lighting on their existing TV and are not even willing to pay for a new TV?
Now you do not need to worry! Lightberry HD is the solution to your problem.
What is Lightberry HD?
Light Berry HD is a well-known company which has taken a major step to evolve and revolutionize the viewing and gaming experience of its target market. The company has used LED in a completely innovative manner as has never been used by Philips in its Ambilight series. With the use of LED, Light Berry HD has made the process economical as well as user friendly.
Steps In Turning Any TV Into An Ambilight TV Using The Lightberry HD
- Installation of accurate System Image.
- Installation of Lightberry HD
- Configuring it.
You require the following tools to complete this process.
- Micro SD card and Raspberry Pi kit.
- Lightberry HD bundle.
- HDMI splitter.
Step 1: Accurate System Image Setting:
- The first step is the setting of the correct system image. You have to download the correct version from the official website of Lightberry HD.
- Next, you will have to download the software that will install this image on your microSD card.
- Now insert the SD card into your PC via SD card adapter slot.
- After this, install the System Image on your card. As soon as the installation process is complete, eject the SD card from your PC and pull it in Raspberry Pi.
Step 2: Raspberry Pi Installation on TV:
All the instructions are available in the instruction sheet provided with Rasberry Pi. You just need to follow the instruction and manage the hooks of Lightberry HD accordingly.
- The next step is to align the LED’s at the corner of your TV screen. Observe and assure that the LEDs are facing towards the corner of your LED.
- Align LEDs according to their numbers set on the bottom right and left, making sure that they all are same.
- Now, remove the cover from the LED strip and fix this to the hooks.
- When you are done with the above steps, connect the LEDs with Raspberry Pi unit via the Lightberry HD unit. Also, connect HDMI splitter and converter with the provided HDMI cable and the video convertor to the secondary Lightberry HD unit.
Configuration process:
- For the configuration of Lightberry HD, you have to plug a mouse and show into the Raspberry Pi unit.
- When the Raspberry Pi is connected and turned on, you have to click on “Hyperion configuration”under the Program menu>Add-ons.
- The next step is to enter the number of LEDs vertically and horizontally on the back of your TV.
- Now, you can test the new settings. After testing, you can unplug Raspberry Pi, however, make sure it’s always connected to power.


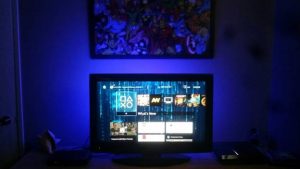
And that s it if you ve followed our instructions, any video signal that passes through the Lightberry HD should produce Ambilight-esque effects around your TV.